
Ultimate Guide to Birria & Quesabirria Tacos

From Crafting the Consomé to Crispy, Cheese-Filled Tacos
Birria: Origins, Definition & What Makes It Special
What is birria?
Birria is a traditional Mexican braised meat stew, originally from the state of Jalisco (though variations exist in neighboring states like Michoacán and Guerrero). Traditionally made with goat (cabrito) or lamb, birria is slowly cooked in a richly spiced chile-laden broth (consomé), yielding deeply savory, complex flavors.
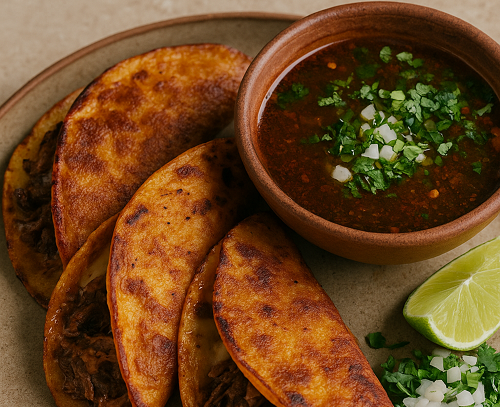
Over time, taco vendors transformed birria into quesabirria or birria tacos: tortillas (often corn) dipped in the fat-laden consomé, then filled with shredded birria and cheese, crisped, and served with a side of the dipping broth. The combination of melt, crisp, rich sauce, and savory meat makes it extremely satisfying.
Why birria stands out:
- Multiple depths of flavor: chiles, aromatics, meat browning, long braise.
- The consomé is not just a sauce — it’s integral: used for dipping and adds moisture.
- The fat from the braise is re-used to crisp the tortilla, giving it a toasty, juicy finish.
- It spans both stew and taco worlds — it’s part comfort food, part street taco.
When we talk about birria tacos, we often refer to quesabirria — tacos with cheese + crispy edges + dippable broth.
Keyword signals to emphasize in this article (to outrank competing pages):
- birria tacos recipe
- quesabirria
- how to make birria
- consomé recipe
- birria tacos at home
- beef birria vs goat birria
Choosing Your Meat: Goat, Beef, Lamb & Wild Options
Traditional vs Adapted Meats
- Goat (cabrito / chivo): historically the gold standard. Lean, distinctive flavor, but often harder to source.
- Lamb: more accessible in many regions, especially in North America. Rich, with good intramuscular fat.
- Beef (chuck, short ribs, brisket, oxtail): the most common adaptation in U.S. and Canada. The article you provided uses chuck + short ribs + oxtail.
Game / Wild Options (for hunters and outdoors cooks)
To appeal to your audience, here are suggestions:
| Wild Meats | Pros | Considerations / Tips |
|---|---|---|
| Venison (shoulder / neck / shanks) | Lean, deeply flavored | Add extra fat (beef tallow or pork fat) to avoid dryness |
| Wild boar | Rich, flavorful, denser meat | Longer braise time, may absorb marinades strongly |
| Elk / Moose (from forestry regions) | Impressive meats | Use portions with more connective tissue for breaking down |
| Lamb raised on pasture / local goat | Authentic, sustainable | Maintain spice balance — strong meats can take bold flavor |
Meat mix recommendation (for balanced flavor & richness): 70% primary meat (beef, lamb, game) + 30% richer cut (short rib, oxtail, fatty trim) to supply both fat and depth.
Meat prep tips:
- Trim excessive silver skin, but retain marbling and external fat.
- Cut into uniform 2–3 in (5–8 cm) cubes for even braising.
- Bring meat to room temperature before searing to promote even browning.
Spice & Chile Blend Mastery: Building the Flavor Base
The spice and chile blend is where birria’s signature flavor lies. A deep, balanced chile blend (not overly smoky, not overly bitter) is essential.
Core Chilees & Aromatics (with approximate ratios)
| Chile / Spice | Purpose / Flavor Contribution |
|---|---|
| Ancho (dried poblano) | Rich, sweet, mild heat |
| Guajillo | Bright, fruity, moderate heat |
| Chiles de árbol / cayenne | Adds heat & vibrancy (sparingly) |
| Pasilla / Mulato | (Optional) deeper earthiness |
| Garlic + white onion | Foundation aromatics |
| Tomato / Roma | Body, acidity, color |
| Mexican oregano | Herbal, earthy – distinctly Mexican |
| Cumin, coriander seeds | Warm undertones |
| Bay leaves | Layered complexity |
| Mexican cinnamon (canela) | Subtle sweet/spice accent (optional carefully) |
| Cloves | Use very sparingly — potent |
Preparation & Technique
- Trim & destem dried chiles; optional: partially de-seed (keep some for heat).
- Toast chiles and whole spices (cumin seeds, coriander, peppercorn) in a dry skillet just until aromatic (do not burn).
- Simmer chiles + onion + garlic + tomato in water (or part broth) to soften—about 15–20 minutes.
- Strain / remove seeds / skins if necessary, to avoid bitterness.
- Blend until extremely smooth (use high-speed blender).
- Pass through fine sieve if needed to remove residual bits.
Pro tip for outdoors / primitive setups:
- Use a cast-iron skillet or flat-rock griddle to toast chiles over coals.
- Soak chiles in hot but not boiling water to better retain flavor.
- Use a portable hand-crank or small battery blender or food mill if no electric.
Braising Technique: From Raw Meat to Shreddable Perfection
This section bridges the critical physics/chemistry of braising — connective tissue breakdown, moisture management, etc.
Step 1: Searing (Maillard Reaction)
- Preheat a heavy pot (Dutch oven, cast iron) until hot.
- Use neutral oil (avocado, vegetable) with high smoke point.
- Sear meat cubes in batches — avoid crowding — ensuring deep browning on all sides.
- The browned fond (bits stuck to pot) contributes flavor when deglazed by sauce.
Step 2: Deglazing & Integrating the Sauce
- Add 1 cup of broth or water to the blender to pick up residual bits (“fond swish”) and pour into the pot.
- Pour the blended chile-tomato mixture over the seared meat.
- Add remaining broth or water (to cover meat 2/3 to ¾).
- Add bay leaves and any leftover whole spices.
Step 3: Braising (Low & Slow)
- Bring to a gentle simmer on the stovetop; once simmering, cover and transfer to oven (or maintain stovetop low).
- Target low temperature braising: ~275–300 °F (135–150 °C) for 3–4 hours until meat falls apart easily.
- Optionally, check at mid-point (1.5–2 hrs) to skim impurities or gently stir.
Step 4: Resting & Fat Separation
- After braising, remove pot from oven and let it rest (covered) 20–30 minutes.
- Use a ladle to skim fat and reserve separately — that fat is gold for crisping tortillas.
- Separate meat from liquid: remove meat, shred, then decide how much consomé (liquid) to return.
Consomé Adjustment for Dipping
- Taste the consomé; typically thin slightly with broth if too intense.
- Adjust salt, acidity (a splash of vinegar or citrus), heat.
- Strain if needed to remove residual grit.
Assembling Crispy Birria Tacos (Quesabirria)
This is where technique meets deliciousness. The goal: crispy + melty inside + juicy bite with consomé dip.
Step-by-Step
- Mix garnish: cilantro, white onion, lime juice, salt in a bowl.
- Warm consomé / fat: ensure you have a shallow bowl of the fat/fat-rich top layer of consomé to dip your tortillas.
- Tortilla dip & crisp:
- Dip a corn tortilla into the fat layer of the consomé (just enough to coat).
- Place on a non-stick or well-seasoned skillet or plancha over medium-high heat.
- Fry ~30 seconds on first side, flip.
- Fill & cheese: Add shredded birria + a small handful of melted cheese (Oaxacan, quesillo, or mozzarella as a substitute).
- Fold & crisp both sides:
- Fold like a taco or quesadilla.
- Continue cooking ~30 seconds–1 minute per side until edges are crisp and cheese is melted.
- Finish: Transfer to warm oven (≈200 F / 90 °C) while you crisp remaining tacos.
- Serve: With consomé for dipping + garnish mixture.
Tips for Crisping Outdoors
- Use cast-iron griddle or skillet.
- Preheat skillet thoroughly.
- Use small ladle or spoon to constantly baste edges with consomé fat.
- Use a flip-spatula to press edges to crisp.
Field & Outdoor Cooking Tips (Dutch Ovens, Campfires, Smoke)
Because you asked from a hunting/outdoor cooking perspective, this section is essential.
Equipment Suggestions
- Camp Dutch Oven (10–12 in / 4–6 qt) with lid for coals/embers.
- Portable cast iron skillet for finishing crisp.
- Charcoal or wood coals, plus iron tripod or chain for hanging pot.
- Heat diffuser / plate setter (if available) to moderate bottom heat.
- Windbreaks, cooking stand, and long-handled tools (tongs, ladles, spatula).
Outdoor Braising Technique
- Prepare the fire bed: let coals form a stable layer. Use indirect heat if possible.
- Place Dutch oven above coals (avoid direct flame). Use a lid with coals placed on top, creating a “full” heating environment (top + bottom).
- Maintain ~300 °F equivalent by managing number of coals under and on lid. Monitor via temperature or visual cues.
- Vent or adjust heat to maintain low, consistent temperature—avoid boil.
- Check periodically (every 60–90 min) to ensure the liquid is not drying — add small amounts of boiling broth/water if needed.
Smoke Infusion Option (if desired)
- Add a small handful of wood chips or chunks (mesquite, oak, fruitwood) atop coals at “top lid” level or near vent.
- Allow smoke to waft over the pot — it will impart subtle smokiness.
- Avoid heavy smoke directly inside pot (can make bitter) — indirect infusion is safer.
Finishing Outdoors
- Transfer the pot off heat when done; rest & skim fat.
- Use the same skillet over coals to crisp tortillas and make tacos.
- Keep consomé warm in a small pot over low coals or suspended.
Serving, Garnishing & Presentation
Traditional Garnish & Accompaniments
- Chopped white onion + cilantro, lightly tossed with lime + salt.
- Lime wedges on the side.
- Radishes, pickled jalapeños, sliced avocado optionally.
- Salsa verde, salsa roja for extra heat.
- Serve consomé in small bowls for dipping.
Plating & Presentation (for photography / hosting)
- Use rustic terra-cotta plates / wooden boards.
- Garnish with cilantro sprigs, lime halves.
- Show tacos folded, with consomé bowl in front.
- Highlight the crispy edges and melty cheese in close-up shots.
Pairings & Beverages
- Mexican horchata, agua de jamaica, beer (if allowed locally).
- Side dishes: Mexican rice, refried beans, escabeche.
Troubleshooting & Common Pitfalls
| Problem | Likely Cause | Solution / Prevention |
|---|---|---|
| Meat is tough, not shreddable | Braise temp too high / not long enough | Lower heat, extend braise time |
| Consomé bitter | Overtoasted chiles, seeds, skins | Remove seeds early, strain, discard overly charred bits |
| Cheese didn’t melt | Too low skillet temp | Increase heat, cover briefly, allow residual heat to finish |
| Tortilla soggy | Too much dipping, too slow crisping | Dip just lightly, press edges, crisp at higher temp |
| Dry meat | Lean cut or under-sauciness | Add more consomé during braise, include fat portion |
| Greasy consomé | Excess fat not trimmed | Skim fat aggressively, reserve for crisping |
Make-Ahead, Storage & Reheating
Make-Ahead Strategy
- Cook birria (meat + consomé) 1–2 days ahead.
- Once cooled, refrigerate, fat will solidify—use that for crisping.
- Shred meat and store separately or submerged in consomé.
- Store consomé and shredded meat in airtight containers.
Freezing
- Separate meat and liquid (strain). Freeze in suitable containers leaving headspace.
- Freeze up to 2–3 months for best flavor.
- Thaw in refrigerator overnight; gently rewarm consomé, keep meat in warm liquid to retain moisture.
Reheating & Crisping
- Warm consomé on stovetop/over fire until simmering.
- Dip tortillas in fat layer, crisp, fill, assemble as fresh.
- Optionally, a quick bake (350 °F for 5 min) helps revive crispiness.
Variations, Fusion Twists & Regional Styles
Once mastered, you can experiment:
Regional Variants
- Birria de Res (Beef Birria): more common in U.S. versions.
- Birria de Borrego (Lamb Birria): popular in some Mexican states.
- Birria de Pescado / Seafood Birria: coastal twist (use lighter broth).
Fusion Ideas & Twists
- Birria Ramen: serve shredded birria in ramen broth + noodles. (Cozy Kitchen references this).
- Birria Pizza: use birria + cheese on pizza crust, drizzle consomé.
- Birria Quesadilla / Pizza Quesabirria: larger flat tortillas folded, crisp both sides, slice.
- Birria Tostadas / Sopes: crisp base, topped with birria + consomé drizzle.
Dietary Adaptations
- Lower-sodium: reduce added salt, use low-sodium broth.
- Vegetarian/Plant-based “Birria”: use jackfruit or mushroom “shreds” + chile broth — while not traditional, fun for experimentation.
- 45
- 832


